Saturday, January 7, 2012

DIY Chalkboard

My Sweet Husband and I live in a darling home that we rent - I would LOVE to own it because it is about 86 years old and has all the original wood work (floors, doors, etc). However, we are both still in school and not sure where we are going to be living after we finish grad school.  Since we rent, we cannot paint the walls - which means we cannot paint a chalkboard wall in the kitchen - sad face.  So I made a chalkboard out of an ugly painting that I picked up at Goodwill.....here is how you make it!!

1. Go to your local Goodwill and pick up an old, ugly picture - you want it to be pretty large and try to find something with a cool frame that you can paint.  You also want to get something that has glass (not plastic) covering the picture.  My picture was super ugly, but it was cherished by the previous owner because it was professionally framed - it was nailed in the back so I could not take the glass out without a lot of unnecessary work.  My steps show you how to do this if you can't get the glass out easily.  If you can take the glass out of the frame this will be so much easier!  

2.  If you don't have these paint supplies you need to buy them:  

This is GRIPPER by Glidden.  This stuff is a lifesaver!!!  You paint this on over any type of lacquered surface and you will not have to sand or strip off the paint/lacquer!!  This is the greatest stuff ever!!!  I got a small can and I have done multiple projects with it and still have a lot more to use!!  

Indoor/Outdoor Krylon paint - I used Cherry Red Gloss.  This works great for painting your frame!!  I suggest spray paint because it dries really fast =) 

Krylon Chalkboard Spray Paint. This paint is perfect for glass.  I used this to spray paint the bottom/foot of wine glasses.  It is the best for glass.  I use Martha Stewart's Chalkboard Paint for other items such as plastic/metal etc. 

STEP ONE:  PREP YOUR FRAME TO BE PAINTED 
(Tools:  your ugly picture, blue tape, notebook paper, gripper, paint brush)

1.  You need to use blue paint tape on the edges and then I covered the rest of the glass with 2 layers of notebook paper.  
My ugly picture of cows.  Blue tape on the edges of the glass

2.  This pic shows the notebook paper I put down over the blue tape and then I held it all down and in place with more blue tape.  Then I painted the frame with gripper =)  Let your gripper dry - this may take awhile  - especially in the corners!  I let it dry for about 3 hours...you might want to let it dry overnight just to be safe =) 

STEP TWO:  PAINT YOUR FRAME
(Tools:  Spray paint, face mask, good ventilation) 

1.  Once gripper is dry you can spray paint your frame.  I put 3 coats of paint on my frame, allowing it to dry completely between each coat.  

2.  When the paint is dry gently pull off the notebook paper and blue tape. 

STEP THREE:  PREPARE GLASS TO BE TRANSFORMED INTO A CHALKBOARD

1.  Place blue tape on your frame - I allowed a little portion of the frame to be painted black - this helped form a nice smooth line between the red frame and black chalkboard so I didn't have to worry about touch ups afterward.  
You can see the little red line - that is my frame and this red part will be painted with the chalkboard paint.  I suggest you do this to keep from having to touch up your frame after you paint the glass =) 

2.  Next, I put blue tape along the edge of the frame.  I did not push the tape onto the frames edge, instead I let it stay sticking out so it would "catch" any over spray.  
You can kind of see what I mean in this picture - the tape is not pressed onto the edge it is extending out from it.  I hope this makes sense =) 

3.  Now you can spray paint your glass with the chalkboard paint!  I put 3 coats of paint on, allowing it to dry completely between each coat.  

STEP FOUR:  REMOVE TAPE AND HANG YOUR CHALKBOARD

1.  Gently remove blue tape.  
2.  If your tape pulls off some of the paint on the frame do not fret!  You can fix it!  Simply spray a little of the spray paint into a bowl and use a small paint brush to dab paint onto the frame.  You want to let it get on there pretty thick and then let it dry.  I only had a few spots where the paint came off of the frame with the blue tape.  A few coats of touch up fixed it!  

3.  If your frame does not have hooks you can go to a hardware store and buy some hooks to attach to the back of the frame.  Sweet Husband took care of this step for me!  

4.  Then you can hang up your chalkboard!  You will need to prep the chalkboard by rubbing a piece of chalk all over the board (put the chalk on it's side).  Then erase it and you are good to go!

I found the EAT letters at Michael's.  A little black spray paint turned them from bronze to black!  The frame was pretty wide so we were able to just set them on the top  =) 


Tuesday, January 3, 2012

Oh My....

It has been TOO long since I last posted!!!  Ah, grad school, you keep me too buys  =(  However, over Christmas break I accomplished a LOT of DIY projects!!!  I should have all the projects finished and dry by this weekend!  I will post up pics and tutorials then!!!!!

Sunday, August 14, 2011

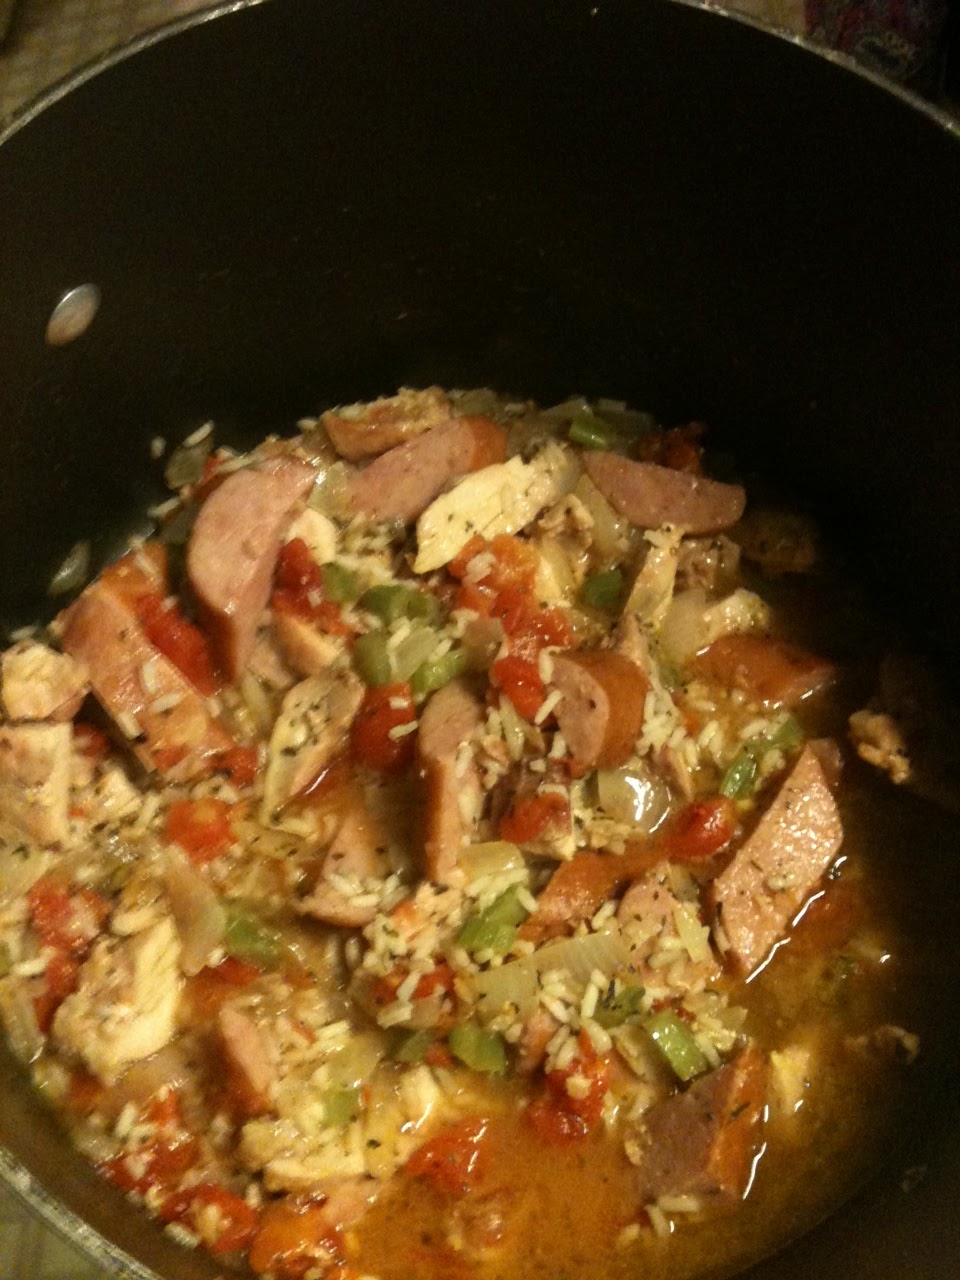
Yummy. Easy. Jambalaya.

I made Chicken Andouille Jambalaya tonight.  It was delicious and easy.  You should make it.  This recipe is so easy and yummy there is nothing more to say - so make it  =)  


I made it with Kielbasa - not Andouille  =)  Just to let you know  =) 

Thursday, August 11, 2011

Amazing Herb Roasted Chicken!!!

Herb Roasted Whole Chicken
Last night's dinner was deemed "Deloycious" by Sweet Husband.  He is a man of few words, and displays excitement subtlety.  Saying dinner was "Delyocious" was the greatest compliment ever! I made the Herb Roasted Whole Chicken compliments of The Pioneer Woman  =) This is an easy - let me say that again - EASY recipe!!  You can prep in about 5 min, pop that lil chick in the oven and then be on your merry way to do as you please for the next hour and fifteen minutes.  Here is how my lil bird turned out: 


 You need to put this recipe in your Toolbox so you are locked, loaded, and ready to go on a night when things get crazy busy.  

Creamy Lemon Pasta
The herb roasted chicken was served on a bed of pasta with mushrooms.  I love the phrase "served on a bed of pasta."  However, I do not like mushrooms - I choked on one as a kid and ever since mushrooms make me skittish. I wanted to make linguine with a cream sauce so I found another pasta recipe on The Pioneer Woman and used the section for the sauce.  The recipe is under Grilled Chicken with Lemon Basil Pasta.  I did not add chicken or basil - I just made the sauce.  I changed a few things in the recipe becuase my asthma goes nuts when I have too much dairy.  You can make her sauce just like the recipe - I just substituted some non-dairy products and the sauce was delish! Here is what I did:  

1.  Heat 1/2 stick of butter 
2. Add 3-4 Lemons (I only used 3, the sauce was very strong so a 4th would have been too much but you can always add more at the end if needed)
3.  She calls for 1/2 cup half and half and 1/2 cup cream.  I used 1/2 cup cream and a 1/2 cup Soy Milk (Silk Very Vanilla).  
4. I added a cup of Rice Cheese. This is the greatest non-dairy cheese ever.  It melts like, tastes like and has the texture of real cheese.  Here is a picture of what I buy - usually only Dierbergs carries it.  It is a little pricey but you can get coupons on line by registering online.   I LOVE this cheese. 

 5.  Then you just whisk the sauce, add salt and pepper.  


Tuesday, August 9, 2011

G-R-I-L-L

Sweet Husband is a resourceful man.  He is also very handsome, sweet, intelligent, and funny.  He has excellent taste in beer and a keen eye for items he can repurpose.  Sweet Husband will graduate next fall with his grad degree as a Family Nurse Practitioner - we are both so excited!  I am so proud of the way he tirelessly serves others through his profession.  I am so blessed by having him as my husband - I love him, very much.   

So the point of all this mushy mushy lovey dovey stuff about my Sweet Husband is to show you another one of his wonderful creations - our new Fire Pit/Grill  =) 

Sweet Husband found the bricks for free at a house the city just demolished a few blocks over.  His dad gave him grill grates and then Sweet Husband stuck some long metal tongs with handles through the grates to hold them together and allow for easy grate removal.  I don't have a pic of the grates, but I will add it when I get one!  The fire pit makes a perfect grill and it makes the food taste exceptional. 

Love Summer

Summer break is here!  My first semester of grad school just wrapped up and I have a few weeks to do some serious cooking!  I am excited to start exploring some new recipes! Here is what is on the menu this week!!!

Tonight:  Pan Fried Rib Eye Steak with a Side Salad, Roasted French Bread and Chocolate Chip Cookies for dessert =)

This is the steak prior to cooking.  I thought the recipe was awesome, but I am not a big fan of lemon pepper.  So I diverted from the recipe a little.  I let my ribeyes marinade for about 7 hours in olive oil, season salt, pepper, oregano, basil, and thyme.  I also put some Italian Parsley on the top while it marinated.  After that I followed the steps in the recipe to cook the steaks =) 

The rest of the week:  

Friday, June 10, 2011

Grad School

There are many things I love about being in grad school - learning incredible information, having stellar professors, seeing Jordyn Gehret every single day.  But the one thing that I do not love about grad school is the amount of time it takes away from my ability to blog.  I think I am going to have to start blogging once a week on Sunday afternoons.  I am sad about this because I enjoy blogging - but when I prioritize based on what I need to do vs. what I want to do...relaxing and blogging come after school.  Oh prioritization.  This is only for a season though, and what a season this shall be  =)

I do need to get to studying....but before that, there is a book I would like to recommend - I think I am going to get it.  My friend John and his wife Anne Marie gave this book to a good friend of ours that does not like to cook.  The book is The $7 a Meal Healthy Cookbook.  It has 301 nutritious, delicious recipes that the whole family will love - all $7.00 and under!!! I am very excited about this book and I look forward to making some recipes from it!  

OK, study time.  

"If we had no winder, the spring would not be so pleasant:  if we did not sometimes taste of adversity, prosperity would not be so welcome." 
Anne Bradstreet, British Poet.